QuickBooks Shopify Integration – How to Streamline Your Business?
Running an online store and managing your finances effectively can be a juggling act. That’s where the magic of QuickBooks Shopify integration comes in.
This guide will delve deep into the world of the seamless integration between two tools, providing you with step-by-step instructions and insightful explanations.
It’s time to bridge the gap between your online sales and your accounting records!
1. QuickBooks Shopify integration? Why integrate?
QuickBooks is an accounting software that helps businesses manage their finances, including tracking income and expenses, creating invoices and bills, and paying employees.

QuickBooks stands out as a helpful tool for store owners because of its powerful advantages.
- Easy to use: QuickBooks is designed to be user-friendly, even for people with no accounting experience.
- Comprehensive features: QuickBooks offers a wide range of features, from basic accounting tasks to more advanced features like payroll and inventory management.
- Integrations: QuickBooks integrates with a variety of other business software, such as POS software, CRM and marketing automation tools..
Shopify is an eCommerce platform that helps businesses create and manage their online stores. It provides tools for listing products, processing payments, shipping orders, and tracking customers.
There is no doubt that Shopify is an eCommerce giant in this field because of its top-notch features and superiority.
- Easy to set up: Shopify is very easy to set up, even for people with no technical experience.
- Wide range of features: Shopify offers a wide range of features, from basic store setup to more advanced features like marketing tools and omnichannel selling.
- Scalable: Shopify can grow with your business, whether you’re just starting out or you have a large, established store.

The combination of these two dominant tools will offer a bunch of benefits that can supercharge your online business. To be more specific, what can you get from Shopify integration with QuickBooks will include:
- Automated data transfer to save time and reduce errors
- Streamlined workflows
- Clearer financial picture
- Better inventory management
- Simplified tax preparation
- Provide your customer with enhanced customer service regarding order history
Therefore, if you are planning to let your Shopify integrate with QuickBooks, let’s take a look at this detailed guide with us.
2. How to integrate Shopify With QuickBooks?
There are two integration methods, including official Shopify QuickBooks online integration or using a third-party app for QuickBooks Desktop.
If you’re using QuickBooks Online and want a smooth, feature-rich integration with official support, the official QuickBooks Online app is the recommended option.
However, if QuickBooks Desktop is your choice now and you need Shopify integration QuickBooks, you can consider third-party apps. You can check out the detailed guide from Shopify here for QuickBooks POS Shopify integration.
In this article, we will focus on Shopify and QuickBooks online integration guide with step-by-step instructions.
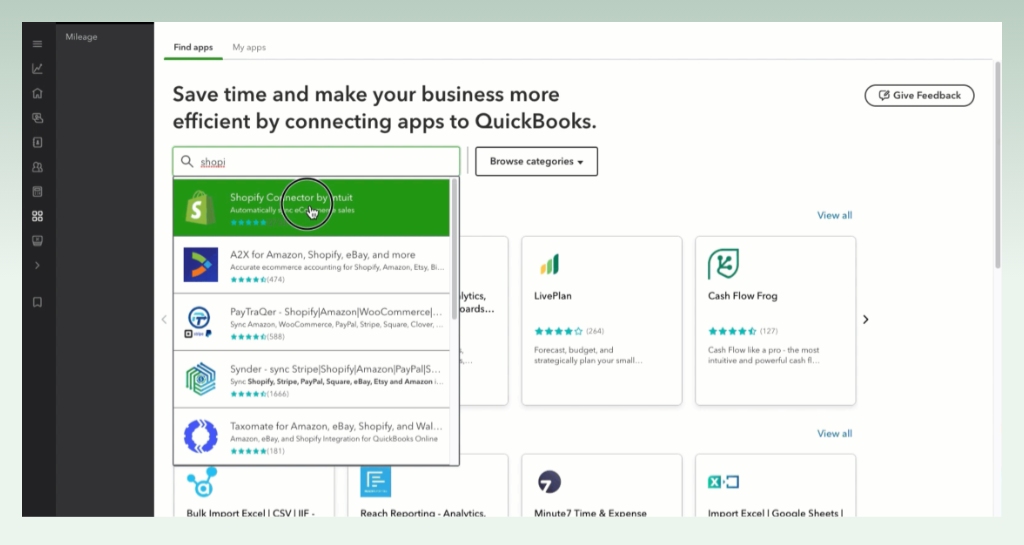
2.1. Install Shopify Connector by Intuit app on QuickBooks
- Sign in to your QuickBooks Online account.
- Go to Apps.
- Select the Find Apps tab.
- Search for the Shopify Connector by Intuit app.
- Select Get app now.
2.2. Connect your Shopify with QuickBooks Online
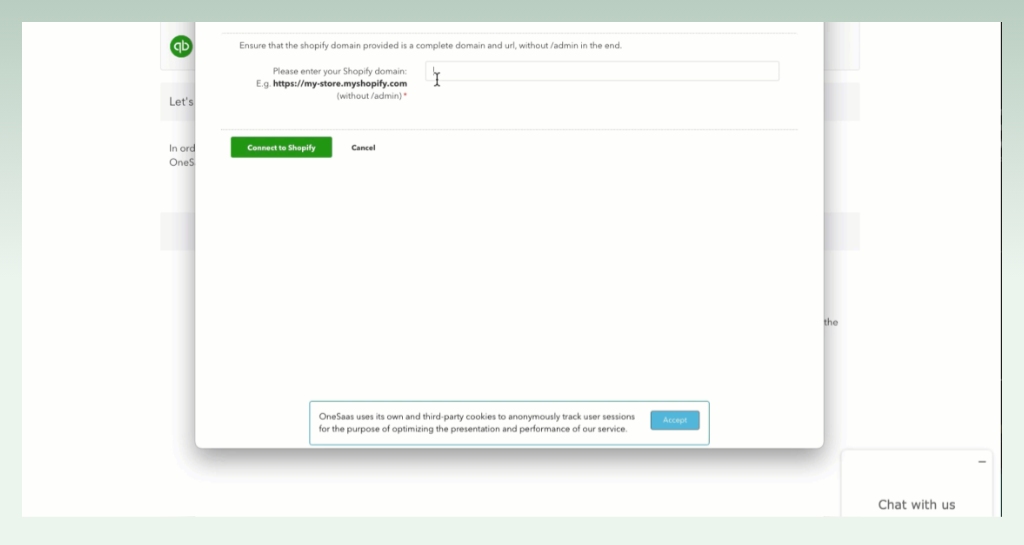
- After installing the Shopify Connector app, you will be redirected to the Connections tab in QuickBooks Connector (OneSaas).
- Select Connect to Shopify.
- A new page will pop up on your screen that allows you to enter the domain URL here. Once done, select Connect to Shopify.
- Sign in to your Shopify store.
Keep in mind that you can either add another connection by selecting Add Connection or move forward and configure your integration.
2.3. Configure your integration
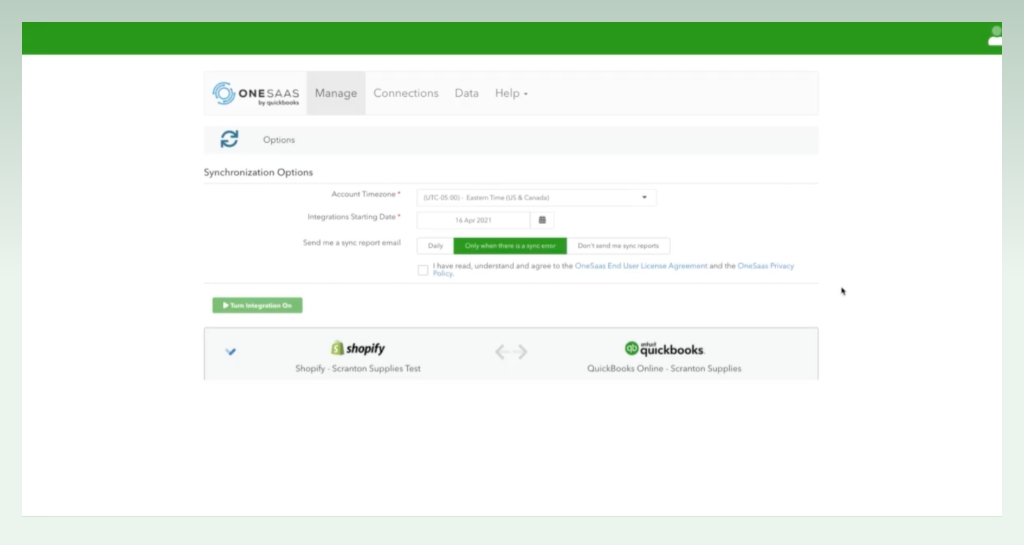
First of all, you need to finish the setup of synchronization options to get started with the syncing process. Some information to fill in includes:
- Account Timezone: Choose your local timezone to ensure accurate timestamping of synced data.
- Integrations Starting Date: Select the date from which data synchronization should begin.
- Email Sync Report Options: Decide whether to receive email reports after data syncs and how often you want them sent.
After that, you will enter the optional workflow to choose which aspects of your business you want to integrate. It will show you options for invoice creation workflow, payouts sync workflow, product creation workflow, and stock update workflow.
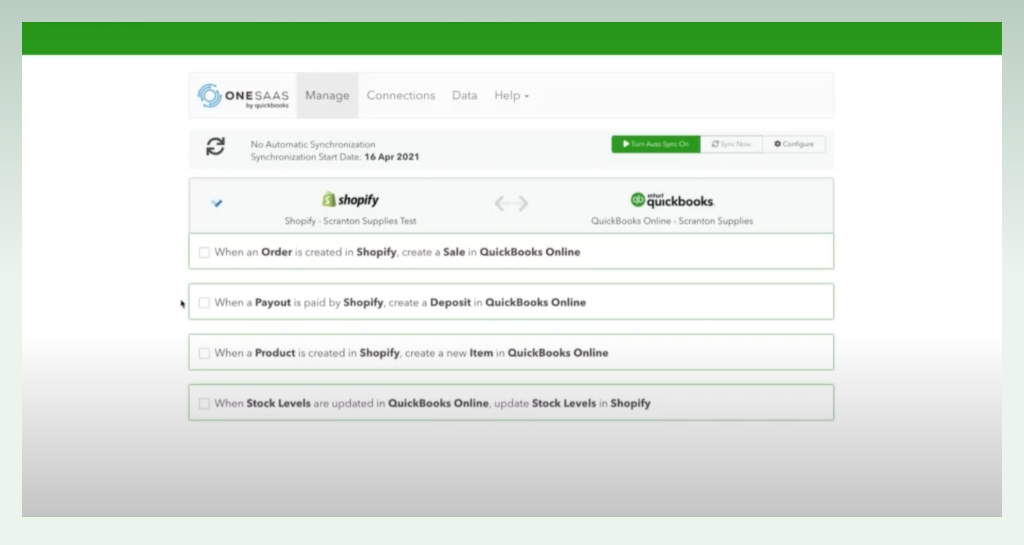
You can tick the boxes next to the workflows you wish to activate.
#1. When an Order is created in Shopify, create a Sale in QuickBooks Online:
- Order Filters: Specify which Shopify orders should trigger invoice creation in QuickBooks Online based on order status (e.g., paid, fulfilled).
- Sale Type: Choose whether to create Sales Invoices (standard invoices) or Sales Receipts (simplified receipts) in QuickBooks Online. In addition, you can customize invoice and receipt templates in QuickBooks Online to match your branding and include additional information as needed.
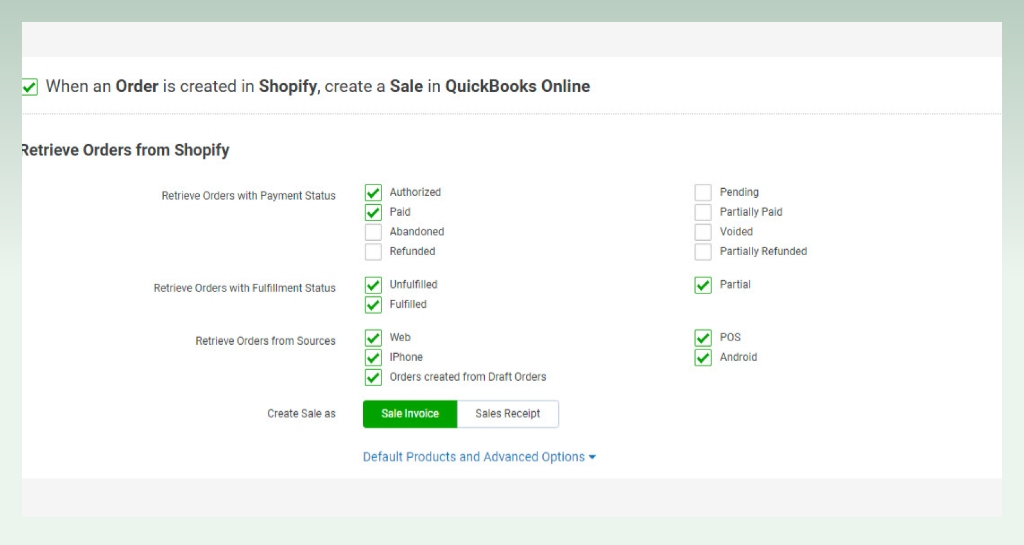
A small note that order edits in Shopify don’t automatically sync to QuickBooks Online, you will need to update relevant invoices manually.
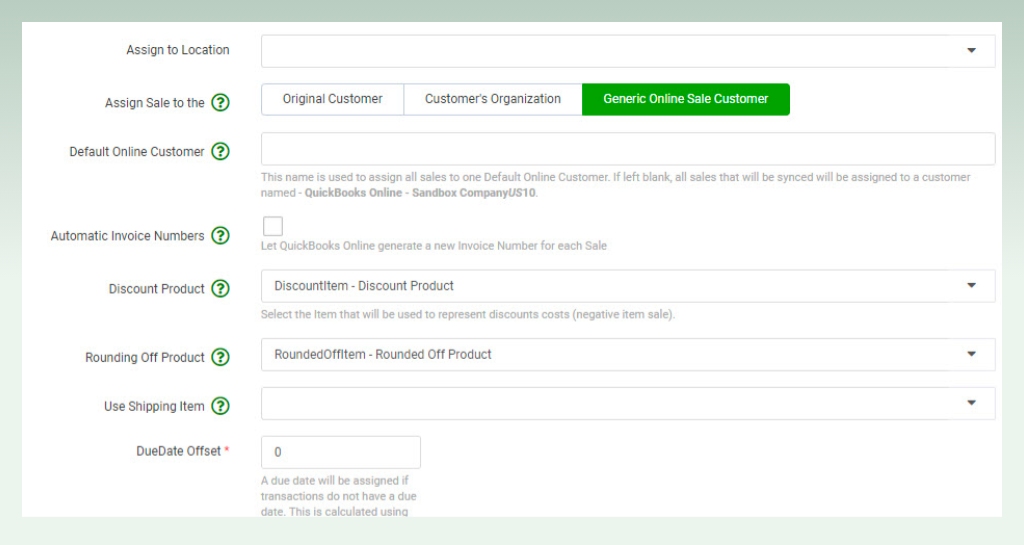
You will need to fill in information for default products and advanced options:
- Order Number Prefix: Add a prefix to Shopify order numbers to differentiate them in QuickBooks Online (e.g., SPFY1234 for order 1234).
- Assign Sales to Class / Assign Sales to Location: These options allow you to categorize sales within QuickBooks Online if you’ve set up these features. Its purpose is to categorize sales based on departments, product lines, projects, or other meaningful segments for analysis and reporting.
- Assign Sale: Determine how customer records are created in QuickBooks Online:
- Original Customer: Uses the customer name on the Shopify order.
- Customer’s Organization: Uses the company name if specified in Shopify.
- Generic Online Sale Customer: Creates a generic “Shopify” customer record.
- Automatic Invoice Numbers: Disregards Shopify order numbers and uses QuickBooks Online’s sequential numbering for invoices.
- Discount Product: Specify a dedicated product for tracking discounts on sales.
- Rounding Off Product: Choose a product to absorb discrepancies due to rounding during data transfers.
- Use Shipping Item: If you charge separate shipping fees, assign a dedicated product to track them in QuickBooks Online.
- DueDate Offset: Specify the default due date for invoices based on the transaction date and offset.
- Allow Credit Card Payments: Enable accepting credit card payments for synced transactions in QuickBooks Online.
Then you will be directed to tax configuration to map each Shopify tax to its corresponding tax code in QuickBooks Online.
In addition, with the Product Matching section, you can choose whether to match Shopify products to QuickBooks Online items by Name or SKU. Ensure all Shopify items have unique SKUs for accurate matching.
- Name Matching: This automatically links Shopify products to QuickBooks Online items with the same product name. You have a product named “T-Shirt – Blue” in both Shopify and QuickBooks Online. Using Name Matching would automatically connect them, simplifying data flow.
- SKU Matching: This uses the unique product identifier (SKU) assigned to each Shopify product to find its corresponding item in QuickBooks Online. For example, you have multiple variations of the same product, like “T-Shirt – Blue (S),” “T-Shirt – Blue (M),” and “T-Shirt – Blue (L),” all with unique SKUs in Shopify. Choosing SKU Matching ensures each variation links to the correct item in QuickBooks Online, providing accurate inventory and sales tracking.
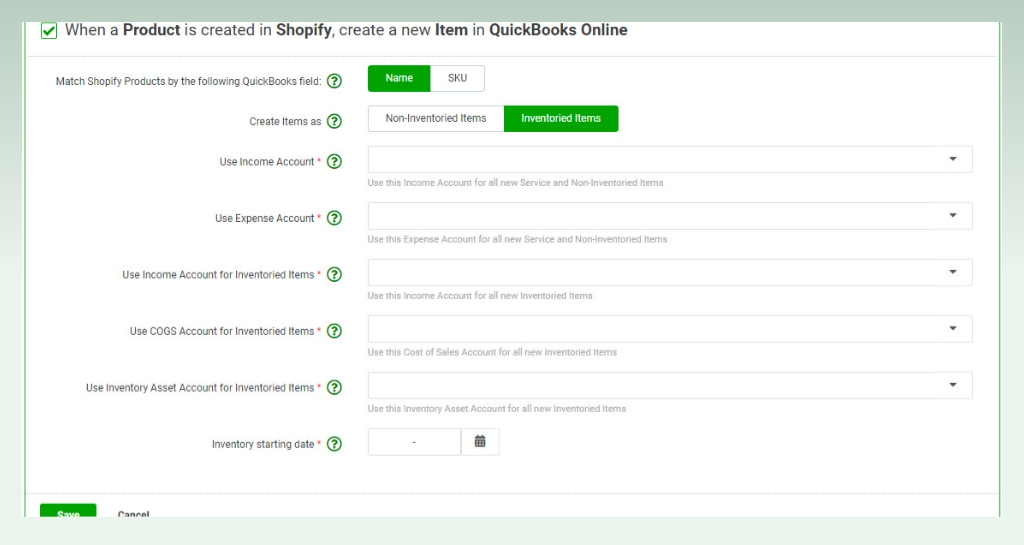
If you want to Create New Items in QuickBooks Online, you can tick this box to automatically create new items in QuickBooks Online for products in your Shopify store. Select income and expense accounts for inventoried and non-inventoried items.
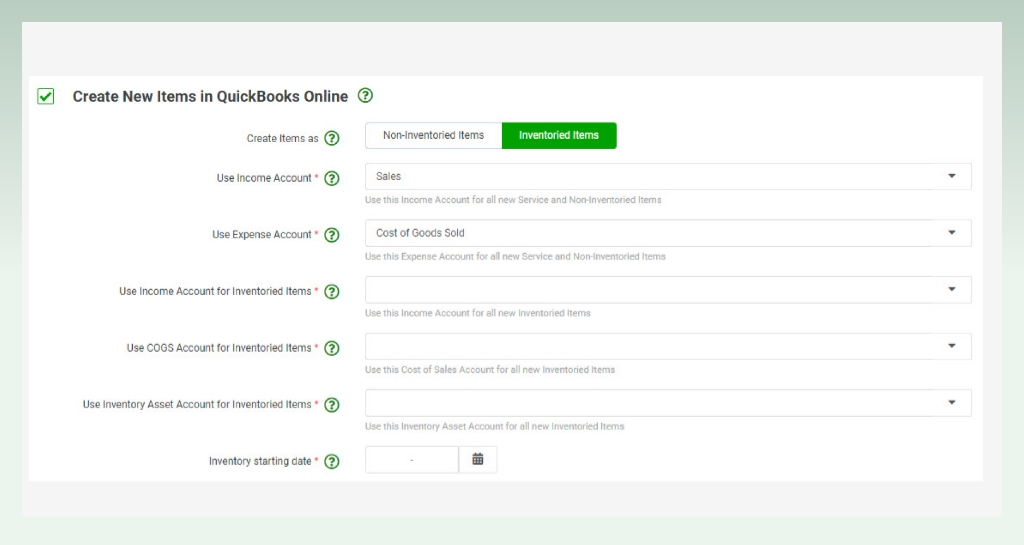
- Inventoried Items: These are products you track inventory levels for in QuickBooks Online. Choose income and expense accounts related to sales and cost of goods sold (COGS) for these items.
- Non-Inventoried Items: These are products you don’t track inventory levels for, like services or digital products. Select income and expense accounts relevant to these items.
Please keep in mind that the app assigns COGS accounts for products but doesn’t sync COGS prices.
The next steps will help you finish the setup of payment and credits:
- Send Payments from Shopify to QuickBooks Online: Enable syncing of payment data from Shopify to QuickBooks Online.
- Advanced Options: Within the integration settings, you can assign each Shopify payment method (e.g., Cash on Delivery, PayPal) to a dedicated clearing account in QuickBooks Online. When a Shopify order is paid with a specific payment method, the corresponding transaction in QuickBooks Online automatically flows through the assigned clearing account.
- Create Credit Notes in QuickBooks Online: Activate this option to sync Shopify credit notes to QuickBooks Online. Map a fallback account for refunds and set a refund number prefix.
- Sync Shopify Fees: Choose to sync Shopify fees as expenses in QuickBooks Online bills. Configure the Payments section’s Payment Method accounts appropriately based on your region.
Small Note: Shopify fees sync as Expenses in QuickBooks Online bills. Configuring specific Payment Method accounts in QuickBooks Online is recommended for accurate fee sync.
#2. When Payouts are sent from Shopify to QuickBooks Online:
This workflow automatically creates deposits in QuickBooks Online for Shopify payouts.
If you are unfamiliar with Shopify payouts, you can refer to the provided Shopify support guide.
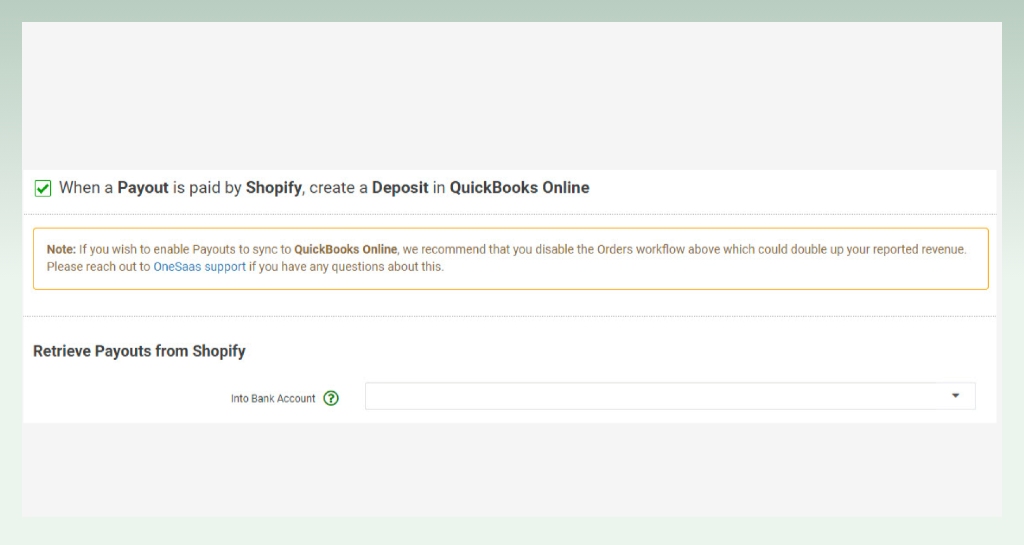
- Into Bank Account: Map the account where Shopify payouts will be recorded as bank transactions (Other Current Asset or Bank account).
- Create a Deposit: Assign a default payment method for payments missing in Shopify payouts.
- Use Income Accounts: Map different Shopify payment methods to specific clearing accounts in QuickBooks Online. Unspecified methods will be sent to the default account.
- Use Expense Accounts: Map the expense account for fees, charges, and taxes associated with payouts.
#3. When a Product is created on Shopify, create new Items in QuickBooks Online:
Please tick this box to automatically create new items in QuickBooks Online for new Shopify products. Choose income and expense accounts for inventoried and non-inventoried items.
#4. When Stock Levels are updated in QuickBooks Online, update stock levels in Shopify:
This synchronizes your Shopify stock levels with changes made in QuickBooks Online. You can enable this only if stock levels are already set up in QuickBooks Online. Otherwise, you risk losing your Shopify stock data.
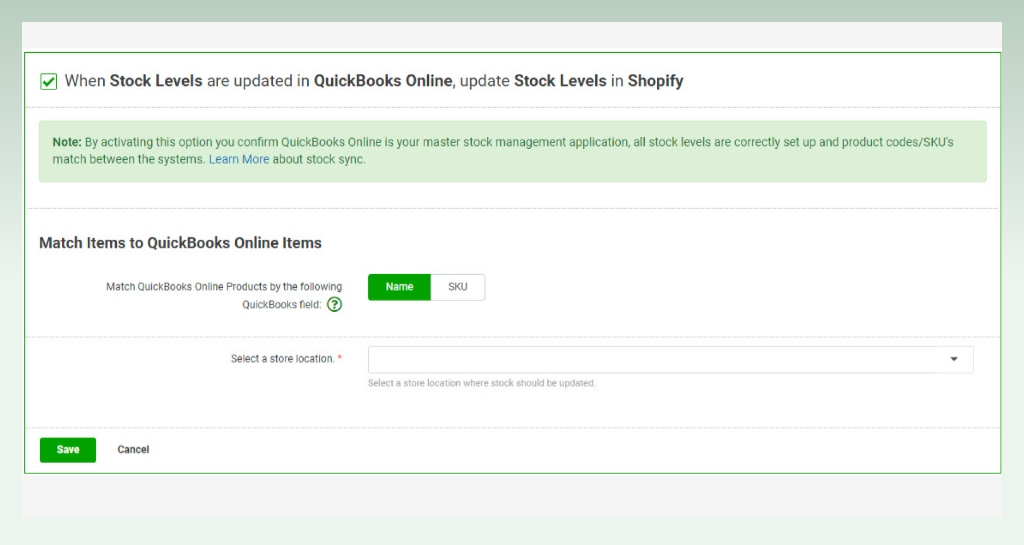
Choose the item matching method (Name or SKU) and the Store Location where stock levels should be updated.
2.4. Save and sync
Please click “Save” after configuring each workflow to lock in your settings.
Your data will automatically sync hourly, but you can trigger manual syncs anytime through the “Synchronization Options” on the Manage tab.
3. Tips for precise Shopify integration with QuickBooks
3.1. Prepare your data
We recommend that you clean up and organize your data in both Shopify and QuickBooks before initiating the integration. This minimizes mapping errors and ensures accurate data transfer.
3.2. Back up your data
It’s never too safe to create backups of your data on both platforms before any major changes like QuickBooks online Shopify integration. You should prepare for unforeseen setbacks and protect your valuable information.

3.3. Follow the app’s instructions carefully
Each app has its own setup process, so pay close attention to the specific steps and configurations required. Don’t hesitate to contact the app’s support team if you encounter any difficulties.
3.4. Map your data accurately
Precisely map fields between Shopify and QuickBooks to ensure proper flow of information. You should double-check product names, tax codes, customer records, and account categories for accuracy.
3.5. Choose the right sync mode
Depending on your data volume and needs, you can select the appropriate sync mode (e.g., real-time, hourly, manual). Consider potential bandwidth limitations and choose a mode that minimizes disruption to your workflows.
3.6. Monitor data regularly
It is necessary to keep an eye on your synced data on both platforms to ensure everything is flowing smoothly. It is vital to look for discrepancies, missing information, or duplicate entries and address them promptly.

3.7. Automate as much as possible
You can leverage automation features offered by the app to minimize manual data entry and reduce the risk of errors. Set up automatic syncing, invoice generation, and inventory updates for efficient time management.
4. The last words
In conclusion, we hope that by following these comprehensive steps, you can achieve a seamless and accurate integration between your Shopify store and QuickBooks Online.
If you are looking for more powerful tools in this eCommerce journey like QuickBooks, feel free to discover eComStart resources with insightful articles and guidelines!
5. FAQs


