
Shopify Sitemap: Boost your store’s SEO in some simple steps

Let’s picture this: Google is like a tourist; they have just visited your online store. Without a map, they will probably get lost in a roundabout. That’s why your Shopify store needs a clear Shopify Sitemap!
To explain in simpler words, a Shopify Sitemap is a file with all the important URLs on your store. It tells search engines what content you have and when it was last updated. The clearer your sitemap is, the easier it is for Google to understand your site.
In this guide, you can learn more deeply about what a sitemap is, why your store needs it, how to find, submit, and fix common issues related to this sitemap. Therefore, you can improve your Shopify store’s visibility and help your pages get indexed faster. Let’s go straight to it!
1. Shopify sitemap overview
1.1. What is a Shopify Sitemap?
A Shopify Sitemap is an XML file – a store’s roadmap, automatically created by Shopify to help search engines like Google, Bing, and Yahoo understand your store’s structure. It lists all your product pages, collections, blogs, and other important URLs, so Google can index them fast.
1.2. Types of Shopify Sitemap:
There are two main types:
- Shopify HTML Sitemap: A more human-friendly version of your sitemap that actual humans can read and navigate. It’s like a clickable table of contents for visitors.
- Shopify XML Sitemap: This is the technical version designed purely for search engines. It’s machine-readable and supports SEO.
🔍 Difference between Shopify HTML Sitemap vs XML Sitemap
Type | Purpose | Access | How to generate |
|---|---|---|---|
HTML Sitemap | Helps visitors navigate and find content easily. | Appears as a regular page on your website with clickable links to all your important pages | Usually needs to be manually created or added via an app |
XML Sitemap | Helps search engines crawl content | You’ll find it at yourstorename.com/sitemap.xml | Shopify creates it automatically |
2. Why does every store need a Shopify sitemap?
A Shopify sitemap isn’t just a file – it’s your secret weapon for eCommerce success. Here are a few solid reasons your Shopify sitemap deserves more love:
- Instant store navigation: Search engines get a roadmap to every corner of your site, so nothing gets left behind in the crawl process.
- Faster indexing: A Shopify sitemap URL helps Google discover and list your pages quicker, then, when potential customers search, your products can appear in search results sooner.
- Improve SEO ranking: A clear Shopify store sitemap boosts your rankings, driving more clicks and upping your conversion rate.
- Auto updates: Shopify’s sitemap.xml refreshes automatically when you add new content, saving you time.
- Shopper-friendly vibes: An HTML sitemap helps real shoppers find what they are looking for faster, keeping customers browsing longer.
- Helps with Large Stores: If your store has hundreds of pages, a sitemap ensures they’re all reachable by bots.
From here, we will go through the steps to find, edit, and submit your Shopify sitemap to Google. Before that, make sure you already have your Shopify store prepared!
👉 If you are new to Shopify, grab the Shopify 1 dollar 3 months deal to start cheap! Or check out how to launch a Shopify store for a step-by-step guide.
3. How to find Shopify sitemap?
⚠️ Notice: Some important things to remember before learning the steps:
- You can always find your Shopify sitemap at your domain root: yourstorename.com/sitemap.xml. Nothing more to do since Shopify automatically generates this file. And, this links to sub-sitemaps for products, collections, blogs, and pages. It updates itself whenever you add new content.
- However, if your store is password protected (e.g., during development or before launching), the sitemap stays hidden. Remove the password to view it.
Once you are good with the most important things to know about the Shopify sitemap, let’s take the steps to find your Shopify sitemap:
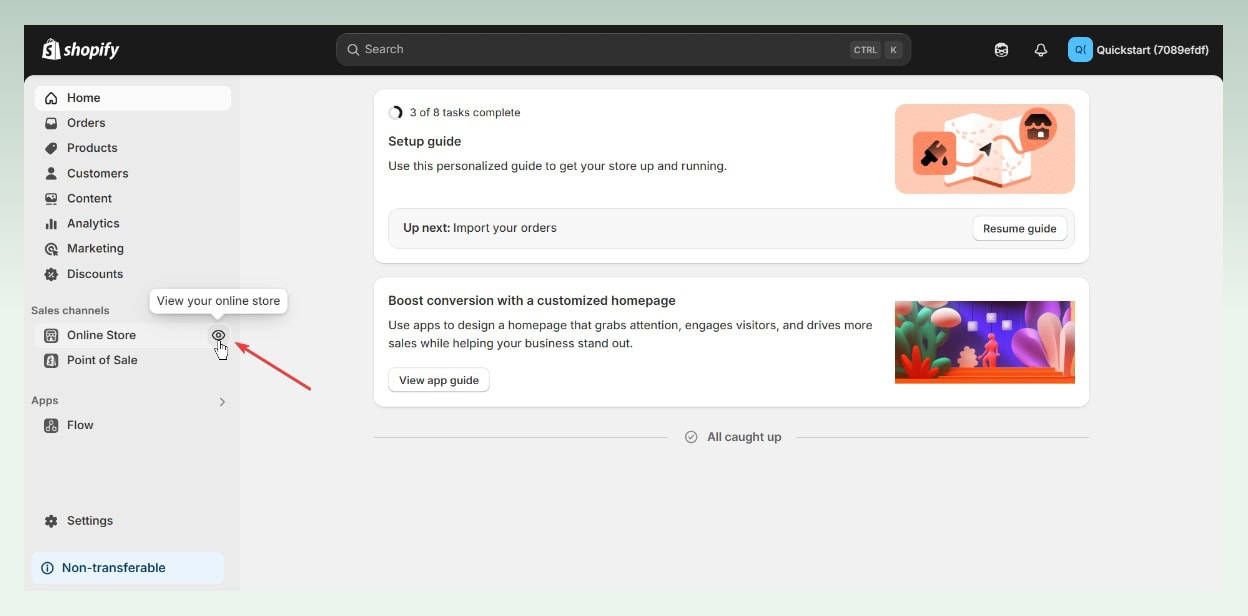
Step 1: Go to your Shopify store URL (e.g., https://yourstorename.com).
In the Shopify admin, you can also click on the eye icon next to “Online store” to navigate to your store.
⛔ Note: This guidance assumes that you have a ready-to-go store! If you don’t have your store yet, explore our pre built Shopify dropshipping store options to skip the setup stress.
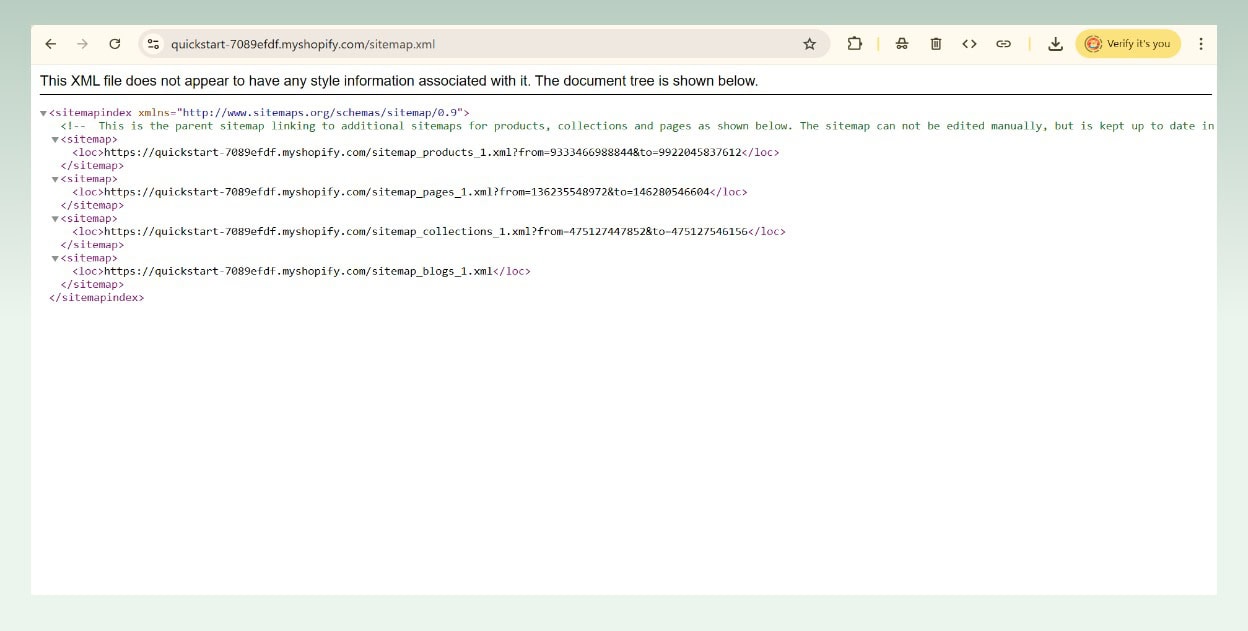
Step 2: Add /sitemap.xml to the end of the URL (e.g., https://yourstorename.com/sitemap.xml).

Step 3: Press “Enter”. Your browser will show the Shopify sitemap XML.
Don’t worry if it looks like a bunch of code – that’s normal!

Step 4: You’ll see sub-sitemaps listed for products, collections, blogs, and more.
4. How to verify your Shopify store with Google?
Before you can tell Google about your Shopify sitemap, you need to prove you are the legitimate owner of your Shopify store. To do that, we need to use a tool from Google – Google Search Console (GSC). Make sure to sign up if you don’t have an account. Then, we can proceed with the steps to verify your Shopify domain with Google:
Step 1: In Google Search Console, click the “≡” menu and select “Add property”.

Step 2: Choose URL prefix, enter your full domain (e.g., https://yourstorename.com), and click “Continue”.

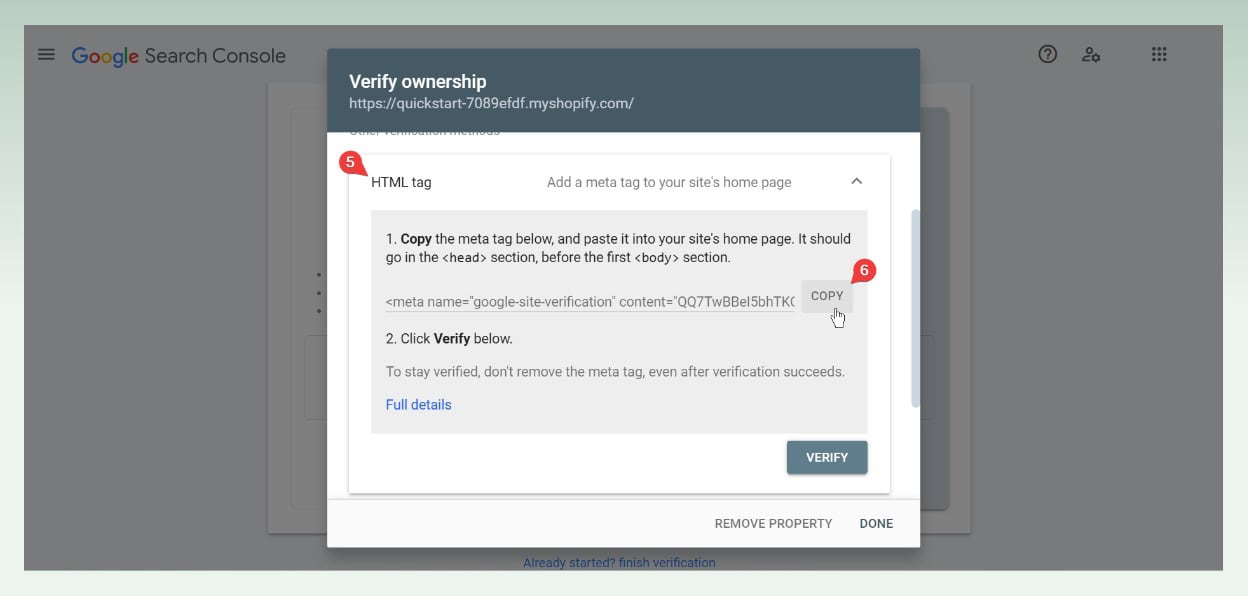
Step 3: Choose the HTML tag as the verification method to expand the guidance tab. Then, click on the “Copy” button to get the meta tag.
Step 4: In Shopify Admin, go to Online Store > Themes > Find your live theme and click on the three dots right next to the Customize button > Edit code.

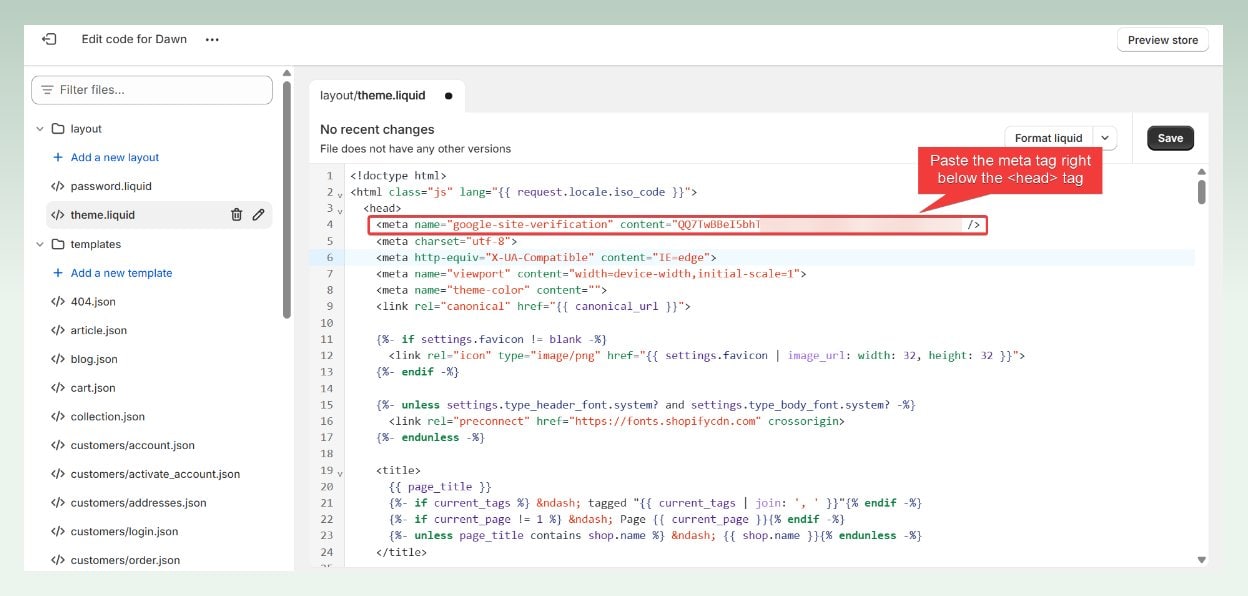
Step 5: Find Layout > theme.liquid.
This is the main template file that controls your entire site’s structure.
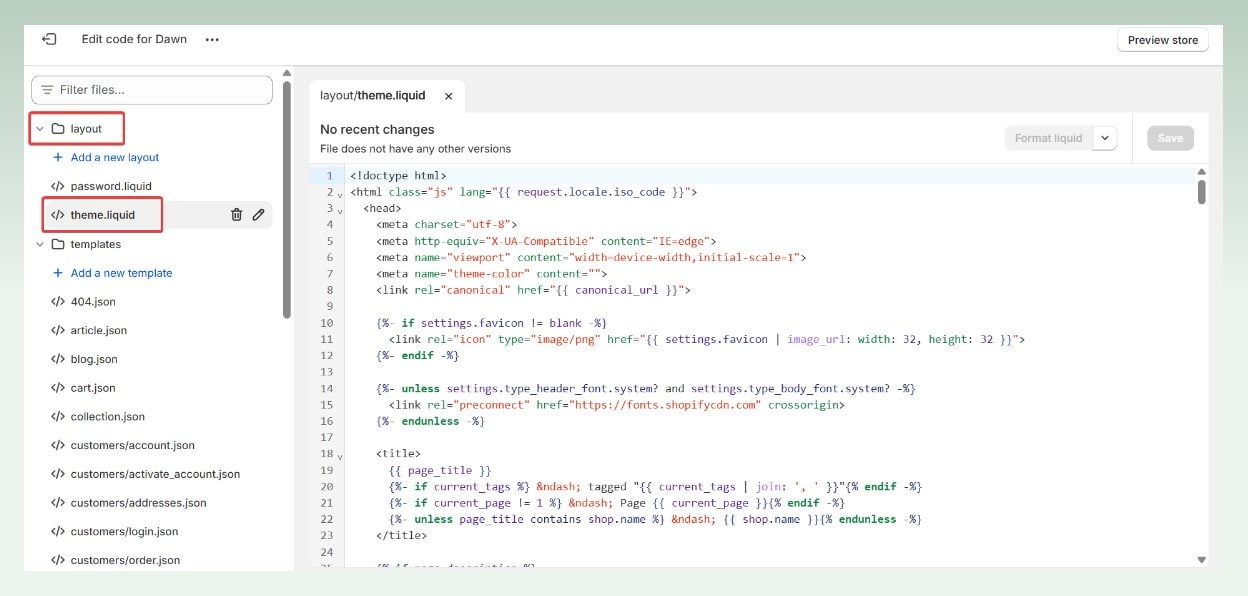
Step 6: Paste the meta tag right below the opening <head> tag.
This placement ensures Google can find the verification code when it checks your site.
Step 7: Click Save.

Step 8: Back in Google Search Console, click Verify.

👉 Find it hard to set all these things up? Try our Shopify store setup service to get rid of all your struggles!
5. How to submit Shopify sitemap to Google Search Console?
Now that your store is verified, it’s time to submit your Shopify sitemap to Google. Then, Google will know where your Shopify sitemap URL is and make it faster to index your site.
Here are the detailed steps to submit the sitemap of your Shopify store to Google:
Step 1: Log into Google Search Console if you’re not already signed in.
Step 2: Navigate to the Indexing section and click on “Sitemaps”.
Step 3: In Add a new sitemap, type sitemap.xml. No need to enter your full domain as Google already has that part filled in. Your domain will look like https://yourstorename.com/sitemap.xml.
Step 4: Click “Submit”.
6. Common Shopify sitemap issues and how to fix them?
Here are five common issues and how to fix them to keep your eCommerce store out of those problems:
6.1. Sitemap not found:
If your store is password-protected (common during development), you can’t get a sitemap from Shopify. Therefore, search engines can’t see your sitemap.
🛠️ How to fix: Disable the password in Shopify Admin > Online Store > Preferences.
6.2. Sitemap not updating after changes:
You’ve added new products or pages, so your sitemap should auto-update. However, they in fact do not appear in your sitemap.
🛠️ How to fix:
- Be patient – Shopify updates sitemaps automatically, but it can take up to 24 hours.
- Clear the store’s cache in Shopify Admin > Apps > Cache to force a refresh.
6.3. Duplicate content errors:
Google might complain about pages or content that are replicated on your site.
🛠️ How to fix: Add canonical tags in theme.liquid to point to the main URL. Shopify usually handles this, but check in Edit code.
6.4. Missing products in your sitemap:
Sometimes products don’t appear in your sitemap even though they exist in your store.
🛠️ How to fix: Check if those products are marked as “Visible” in your Shopify admin. Only visible products will appear in your sitemap.
6.5. Sitemap showing 404 error:
If your sitemap URL returns a “not found” error, something’s wrong with your setup.
🛠️ How to fix: Verify your store is on the Shopify plan that includes sitemap generation (all paid plans do). Double-check the meta tag in the theme.liquid. Make sure there are no typos or extra spaces messing things up.
6.6. Too many redirects error
This usually happens when there’s a conflict between the HTTP and HTTPS versions of your site.
🛠️ How to fix: Ensure your primary domain is set correctly in Shopify (Settings > Domains) and that SSL is properly configured.
7. Conclusion
Knowing how to use this Shopify sitemap well can give your online shopping store better visibility, more traffic, and ultimately, more sales. Through this tutorial, eComstart walks you through the process from how to get sitemap from Shopify to submitting it to Google Search Console. Furthermore, this article also offers some tips on how to fix common problems related to the sitemap. You now own all the knowledge you need to know about this sitemap and give your store an SEO boost.
To bring your Shopify store to the next level, there are so many more things to learn and optimize. Follow us on eComstart for expert guidance and make your eCommerce business a rockstar!
8. FAQs

